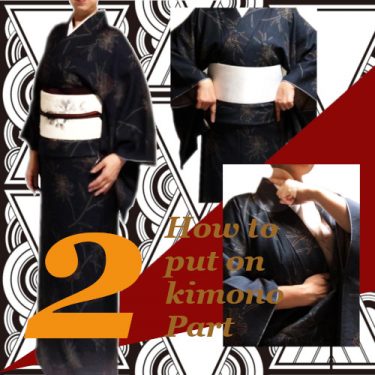
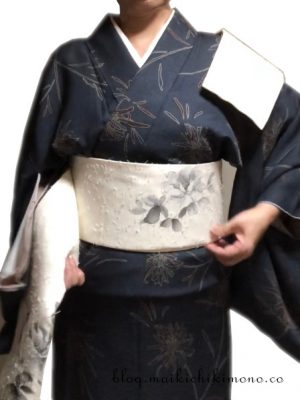
皆さん、次はお待ちかねの帯結びです。
名古屋帯の一重太鼓結びは着物教室のお稽古で必ず初めに習う最も基本的な帯結びです。この結びを習得すればどこでもお出かけできます。
習得目標
- 帯の扱いに慣れる
- お太鼓の構造を知る
- 小物の役割を知る
浴衣の半幅帯とは違い、帯は長いです。帯枕も使うし、帯揚げ帯締めも使います。小物の扱いに慣れましょう。
では・・・少し長いですが頑張ってください!
着物の復習をしたい方はこちらへ
腰紐まで大丈夫? では、ちょっと厄介なおはしょりの始末です。 でも、要所要所できっちり布目を通していけば問題ありません。 一つ一つ確認しながらゆっくり進めましょう。 着付けを楽しむことが大切です。 腰紐[…]
帯を胴に巻く
名古屋帯の仮だたみはできていますか?
テを肩に置き、帯を巻きながら締めていく
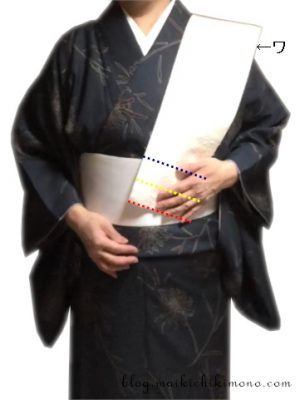
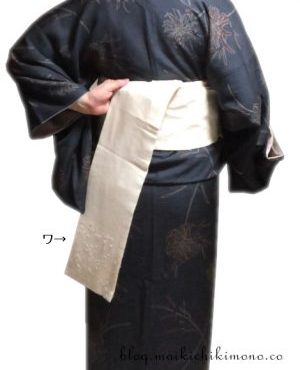
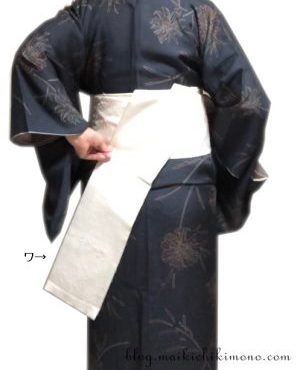
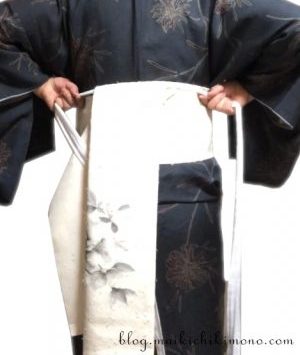
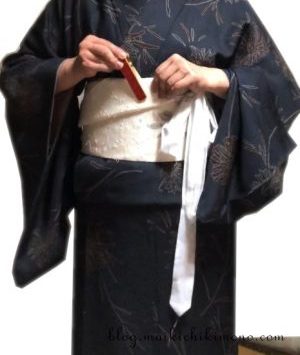
1. テを取り、ワを外側に肩に掛ける。
Take the half-width part called te and put it on your shoulder. The folded edge called wa is facing outward.
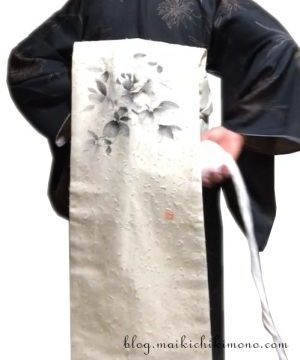
テ先を置く位置によって腹柄の出方が変わる。青は左、黄は真中、赤は右になる。全通柄は帯の長さを考慮する。
The position of front pattern called dou-gara changes depending on the position of tesaki. (Blue : left, yellow : center, red : right.) If you have obi with whole patterns, basically put it on the blue line.
帯の腹にある柄の出し方に特に決まりはありません。左右中央とお好きな場所に合わせましょう。左右の場合は柄の中心をバストトップの位置に合わせます。
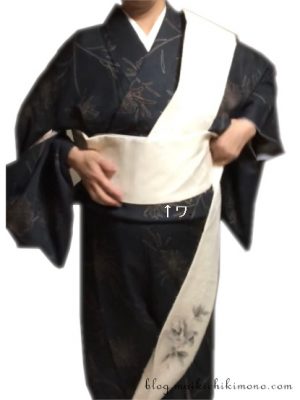
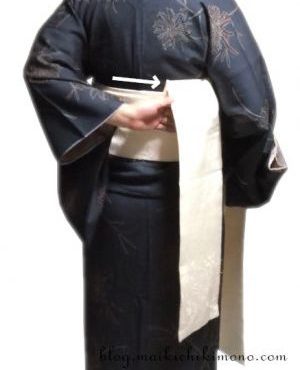
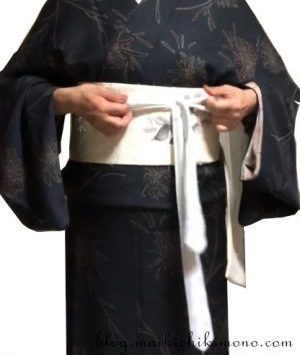
2. 帯板に沿って胴に1回巻く。常に帯下がワになる。
Wrap obi once along the board of obi-ita. The folded edge is always the bottom.
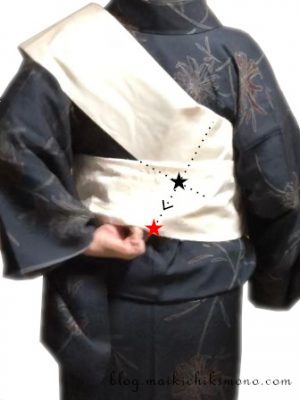
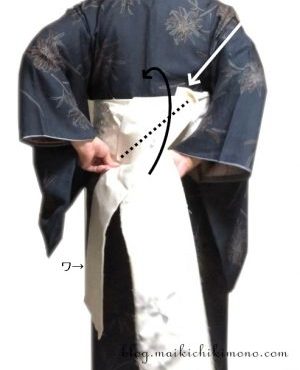
3. ★印を親指と人差し指で取り★印の帯下線背中心まで引く。
Take the diagonal part (black star) from the bottom and draw it (black star) to the bottom line called obishita-sen (red star).
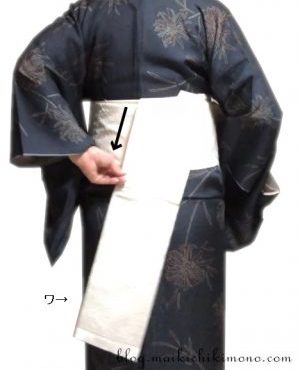
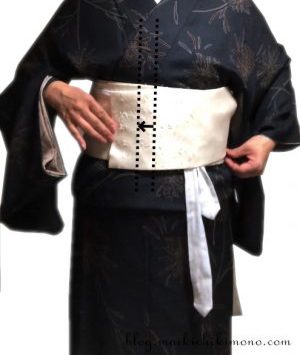
4. ★★印の指はそのままで、右手は斜め前に引き、帯を締める。
Keep the position of the left hand (at the black and red star) and pull the right hand obi forward.
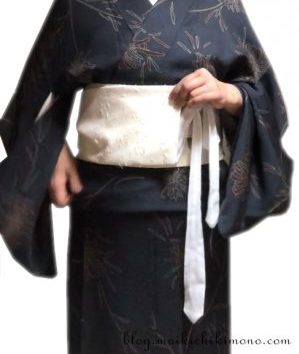
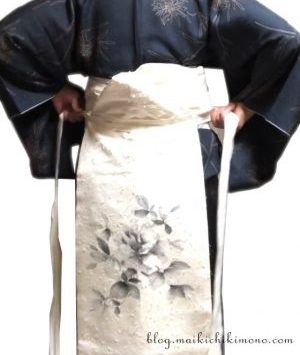
5. 一巻き目に沿って二巻き目を巻く。
Wrap obi again along the first turn.
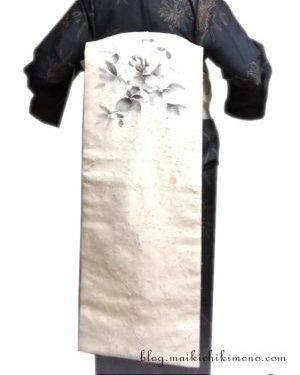
テ元とタレ元を折り上げ、結び目にする
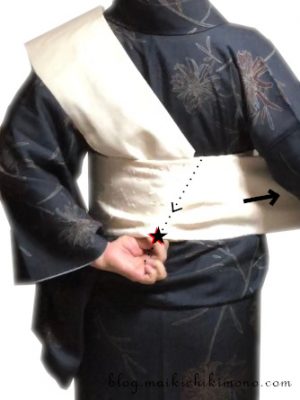
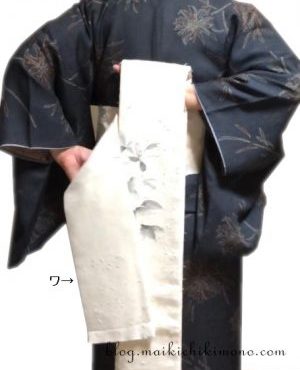
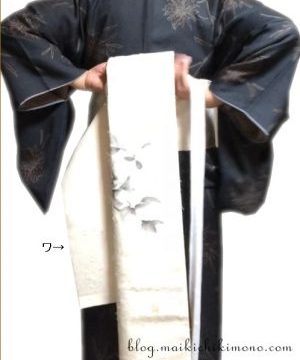
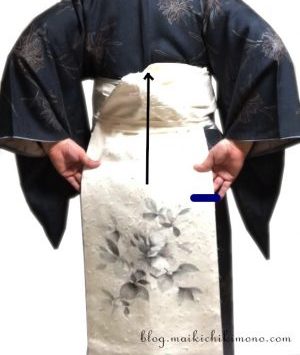
6. テを背中側におろして左端(ワ)を持つ。
Take te off and hold the base of te.
7. 持ったまま背中心よりも右に移動させる。
Slide it to the right beyond the back center.
8. 左手を帯下の位置まで下げる。
Slide the left hand down to the bottom line.
9. 左手を背中心より左に少し移動させ、その場に固定し、右の帯を斜め前に引きいて帯を締める。
Slide it a little to the left, there keep the position and pull the right hand obi.
10. 左手で帯下線をしっかり押さえつつ、右手をタレ帯の裏へ持っていき、点線で折り上げる。
While keeping the left hand position, put the right hand to the back side of tare. Then fold the crossed part up as following the dotted line to make a folded knot.
11. 右手を帯上線の上まで持ってくる。利き手を使うために持ち替えても良い。
Bring the right hand to the upper line of obi . You may switch to your dominant hand.
12. 片手で押さえながら仮紐の中央を手に取り、もう一方の手に持たせる。
Take the center of karihimo and pass it to the other hand.
13. 折ってできた帯の結び目を仮紐で押さえる。
Hold the folded knot with karihimo.
14. 前に持ってきて胴帯の上でしっかり仮結びする。これで折る結び目ができる。
Bring the ends to the front, and temporarily tie them firmly on obi. Now you have a folded knot.
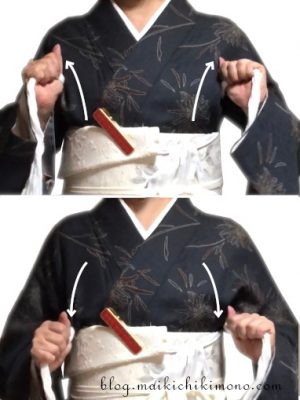
テを前に預ける
15. テを十分に引き、前に持ってくる。テ先の位置が前中心より←方向に約3㎝長ければ、ほぼお太鼓に収まる長さになる。
Pull the te enough and bring it to the front. Is the tesaki at 3 cm from the front center? If it is there, it is the ideal length for ichijudaiko.
16. テが長すぎる場合は十分に引いて反対側に持ってくる。
If it is longer, turn it to the opposite side. If it is short. no problem. Continue as it is.
17. テは脇から折り上げてクリップで前に止めておく。
Pinch the tesaki at the front with a clip.
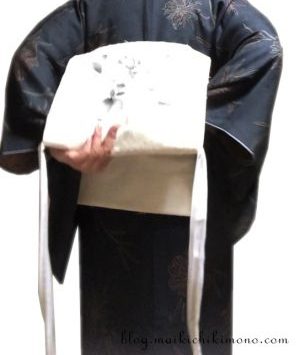
お太鼓を作る
タレ元を広げ、お太鼓の上線を決める

18.背中にある帯の根元を三角に折り、きれいに開く。縫止まりが頂点に来ていると理想的。
Open the base of tare called taremoto and fold into a triangle.
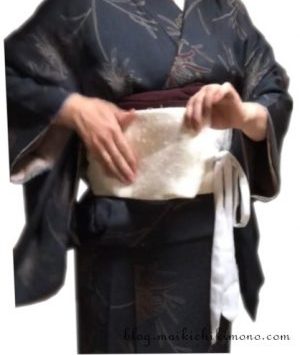
19. 帯の下部にもう一本仮紐を当て、帯を折り上げやすくする。
Tie another karihimo around the waist to keep obi in place.
20. 前でしっかり結んだら、19の仮紐の位置から帯を折り上げる。クリップ(青い太線)位置がお太鼓の山及び帯枕の上線になる。
Fold up the obi from the 2nd karihimo. The blue clip is the mark of the upper line of otaiko.
21.柄を合わせて折り上げたら手で支え、一方の手で帯枕を用意する。
Hold the upper line in place and take a pad for obi called obimakura.
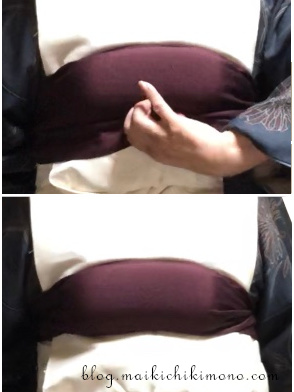
帯枕を背に付ける
22.枕の上下を確認し、枕を横から入れる。
Check the top and bottom of the pad and put it inside.
23. 帯上線を土台にして帯枕を背中にあてる。タレ先が膝裏にあるとお太鼓作りに調度良い長さになる。
Place the pad on the upper line. If taresaki or the end of the wide part of obi is behind the knees, the length will be good for making otaiko.
24. ガーゼを前に引きつつ手を上下させ、脇を締める。帯枕を背中に密着させる。
Hold the gauze string only. While pulling it forward, move it up and down to fit the pad firmly on your back.

25. 前中心を避けて、ガーゼの紐を2回からげて片輪で結ぶ。結んだらガーゼを前に一度引き、帯板と伊達締めの間に下に押し込むようにしまう。
Tie the string aside and pull it forward at the center front. Put the knot deeply between obi and datejime.
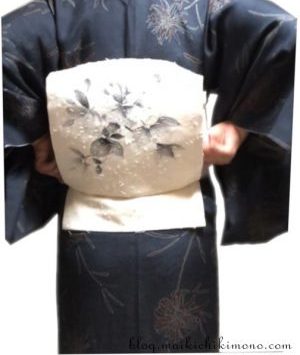
帯揚げを帯枕に被せる
26. 帯揚げの真中を持ち後ろ手に回す。見やすいようにタレをめくっている状態。
Take the center of the cloth called obiage. Bring it to the back.
27. 帯揚げを帯枕の上辺に被せる。
Cover the upper part of the pad with obiage.
28. 帯揚げをしっかり枕の裏に入れ込む。端両は前で仮結びし邪魔にならない場所に挟んでおく。
Wrap the pad neatly by pushing the cloth in. Tie the ends of the cloth temporarily at the front.
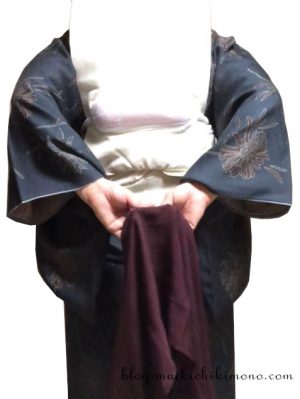
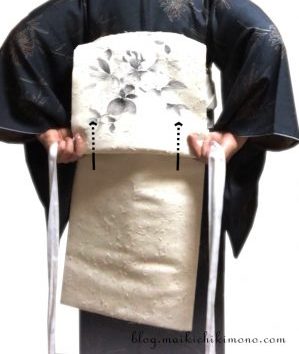
お太鼓の下線を決めてタレ先をとる
29. 帯枕を固定したので仮紐を外す。その仮紐は袂にしまっておくか、再び取りやすい場所へ戻す。
Untie karihimo all.

30. お太鼓を作る。仮紐をお太鼓の下線になる位置(目安は帯下線)にあて、帯端を持って布目を通す。
Place karihimo along the bottom line of obi. Move it to tare and hold them together. Then straighten the fabric grains of the obi .
。
31. 後に浮かせて指を使い、タレを少しずつ折り込んでいく。
Tuck the rest of tare inside.
32. ある程度折り込んだら手を持ち替え更に折り込む。
Go on.

33. タレを人差し指1本分残す。約6~8㎝ぐらい。指を使い長さを調節する。
Leave the end of obi called taresaki about 6~8 cm. It’s your index finger length.
34. 仮紐を胴帯の上でしっかり結び、前に預けておいたテを外す。
Tie karihimo firmly on obi and take te off.

35. テを折り返し、お太鼓のすぐ下に差し込む。
Fold te back and insert it right under the layer of otaiko.
36. お太鼓と同じ長さに合わせる。長い場合は折った方を内側に折り込む。テはお太鼓の下線に沿わせる。
Adjust te to the same width as otaiko. If it is long, tuck the folded part inside. Te should be along the bottom line of otaiko.
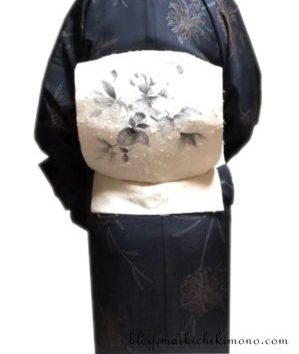
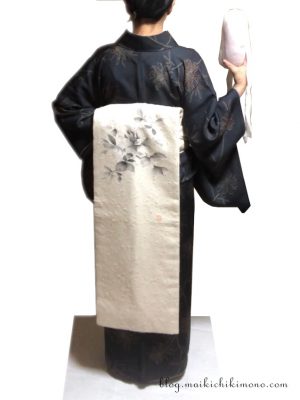
37. お太鼓線はきれいに出たか、柄は良い位置にあるか確認。
Make sure that otaiko line is smooth and the pattern (picture) is in a good position.
一重太鼓のテはお太鼓の正面から見えないようにします。
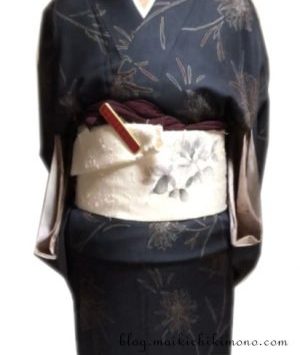
お太鼓の形ができましたね!
さあ、いよいよ仕上げです。頑張りましょう。
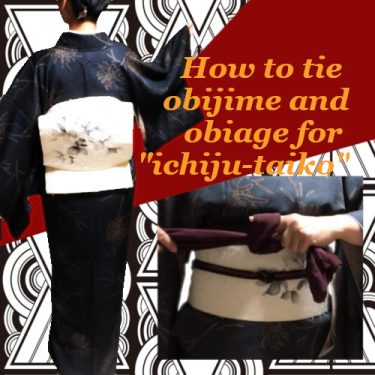
お太鼓結びの続きです。 帯締めには「丸と平」タイプがあります。平には表裏があるので方向を意識して結びます。 結び方は「本結び」です。すべての基本となる結びです。 帯揚げは丁寧に折りたたみながら結びます。 結び方は基本[…]